Update (Jun. 10, 2020): I’m now using pass instead of gnome-keyring. And I also use the newly introduced --noninteractive option to run protonmail-bridge in the background. See the post here.
Update (Aug. 7, 2019): The version of Bridge used in the original post was 1.0.6. I recently upgraded Bridge to 1.1.6 and found there’s only one thing changed: the name of the executable. After upgrading, replace Desktop-Bridge with protonmail-bridge. That’s all.
I have a WordPress server on Google Cloud Platform. And recently I just became a user of ProtonMail. So I was wondering if I could use ProtonMail’s SMTP with the WordPress server so that the server can send emails/notifications with my ProtonMail address.
ProtonMail provides a utility called Bridge to access its IMAP and SMTP servers. But the problem is that the instance on Google Cloud Platform is headless. And ProtonMail Bridge is not friendly to headless environments. Luckily, I was able to find a solution on the internet. See my previous post. After I got Bridge running on the instance, then other things are simple. And this post is about how I did it.
If you want to try my solution in this post, please make sure:
-
- You have an SMTP plugin installed on your WordPress server. For example, WP Mail SMTP.
- You have a ProtonMail Plus account, as Bridge does not work with free-tier ProtonMail accounts.
- You have made Bridge work on your server machine. If not, see my previous post for using Bridge in headless environments. (Update (Jun. 10, 2020): if you want to use
passinstead ofgnome-keyring, see this post instead.)
Step 1: Set up Bridge through the command line
Use $ Desktop-Bridge --cli (note: see the update above) to get into a non-graphical interactive interface of Bridge. Type help in the interactive interface to see all supported commands. Basically, if nothing goes wrong, you may only need login to log in your account, change mode to change between combined/split modes, info to see the local fake SMTP information, and exit to exit Bridge.
login: The interactive interface will ask for you ProtonMail username and password.change mode: In combined mode (the default), all emails going to all addresses under your ProtonMail account will be combined as if different addresses are just aliases of each other. And in split mode, different addresses are treated as if they are independent email addresses. It’s up to you to choose either mode.info: You can find the information about the local fake SMTP server. The information contains the local IP address, port, username, and password. Don’t be confused with the username and password seen here with your ProtonMail username and password. The username and password seen here are the ones to use the fake local SMTP server. If you use split mode, you may see several sections in the information, and each section refers to an address.exit: Completely exit Bridge. Bridge will not automatically run in the background after exit.
For example, I have two addresses under my ProtonMail account: abc@protonmail.com and abc@pm.me, and I prefer the split mode. The output after I issue the info command may look like:
Configuration for abc@pm.me
IMAP Settings
Address: 127.0.0.1
IMAP port: 1143
Username: abc@pm.me
Password: defghijklmnop!@#

SMTP Settings
Address: 127.0.0.1
SMTP port: 1025
Username: abc@pm.me
Password: defghijklmnop!@#

Configuration for abc@protonmail.com
IMAP Settings
Address: 127.0.0.1
IMAP port: 1143
Username: abc@protonmail.com
Password: defghijklmnop!@#

SMTP Settings
Address: 127.0.0.1
SMTP port: 1025
Username: abc@protonmail.com
Password: defghijklmnop!@#
I choose to use abs@pm.me to send emails for my WordPress server, then the information in the subsection of SMTP Settings under Configuraiton for abs@pm.me is what I need later.
Exit Bridge before getting into the next step.
Step 2: Run Bridge in the background
In headless environments, the only way to launch Bridge is through the command line $ Desktop-Bridge --cli. However, this will get you into an interactive environment, as mentioned in the previous step. This means you can not simply send the process to the background with something simple like nohup, & or the combination of ctrl+z and bg. To send this kind of job to the background, we first have to create a file to mimic an input pipeline:
$ mkfifo bridge_input
Next, we launch Bridge in the background, but at the meantime, we tell it that, instead of using standard I/O, it has to read input from bridge_input and write output to bridge_output:
$ nohup Desktop-Bridge --cli < <(tail -f bridge_input) &> bridge_log &
If you do $ cat bridge_log, you should see the welcome message from Bridge. And if you do $ echo "info" >> bridge_input to issue a info command to Bridge, and then do $ cat bridge_log, you should see the output of info.
Finally, in some systems, you may have to do$ disownto detach jobs from the current shell session, so that you can log out the session without terminating the jobs. To check you indeed detached all jobs, use$ jobs -l. If nothing in the output, then that means you are good to go.
In the future when you want to stop Bridge, you can issue a exit command through $ echo "exit" >> bridge_input.
Step 3: (Optional) Test if Bridge in the background is working
An easy way to test if the Bridge is running in the background is to telnet to the fake local SMTP server:
$ telnet 127.0.0.1 1025
The IP 127.0.0.1 and the port 1025 can be found in the info output of Bridge, as mentioned in step 1. If Bridge is indeed running in the background, you should see the welcome message from the SMTP server. Then type quit to exit the telnet session.
Successfully telent into the SMTP server doesn’t mean you can also successfully send an email through it. But it’s off the topic here, so I won’t cover it. For those who are interested, please refer to Google and search for how to send a test mail after telnet to the SMTP. Here we simply assume that successfully telnet into the SMTP server means everything works fine.
Step 4: Set up SMTP server information in WordPress
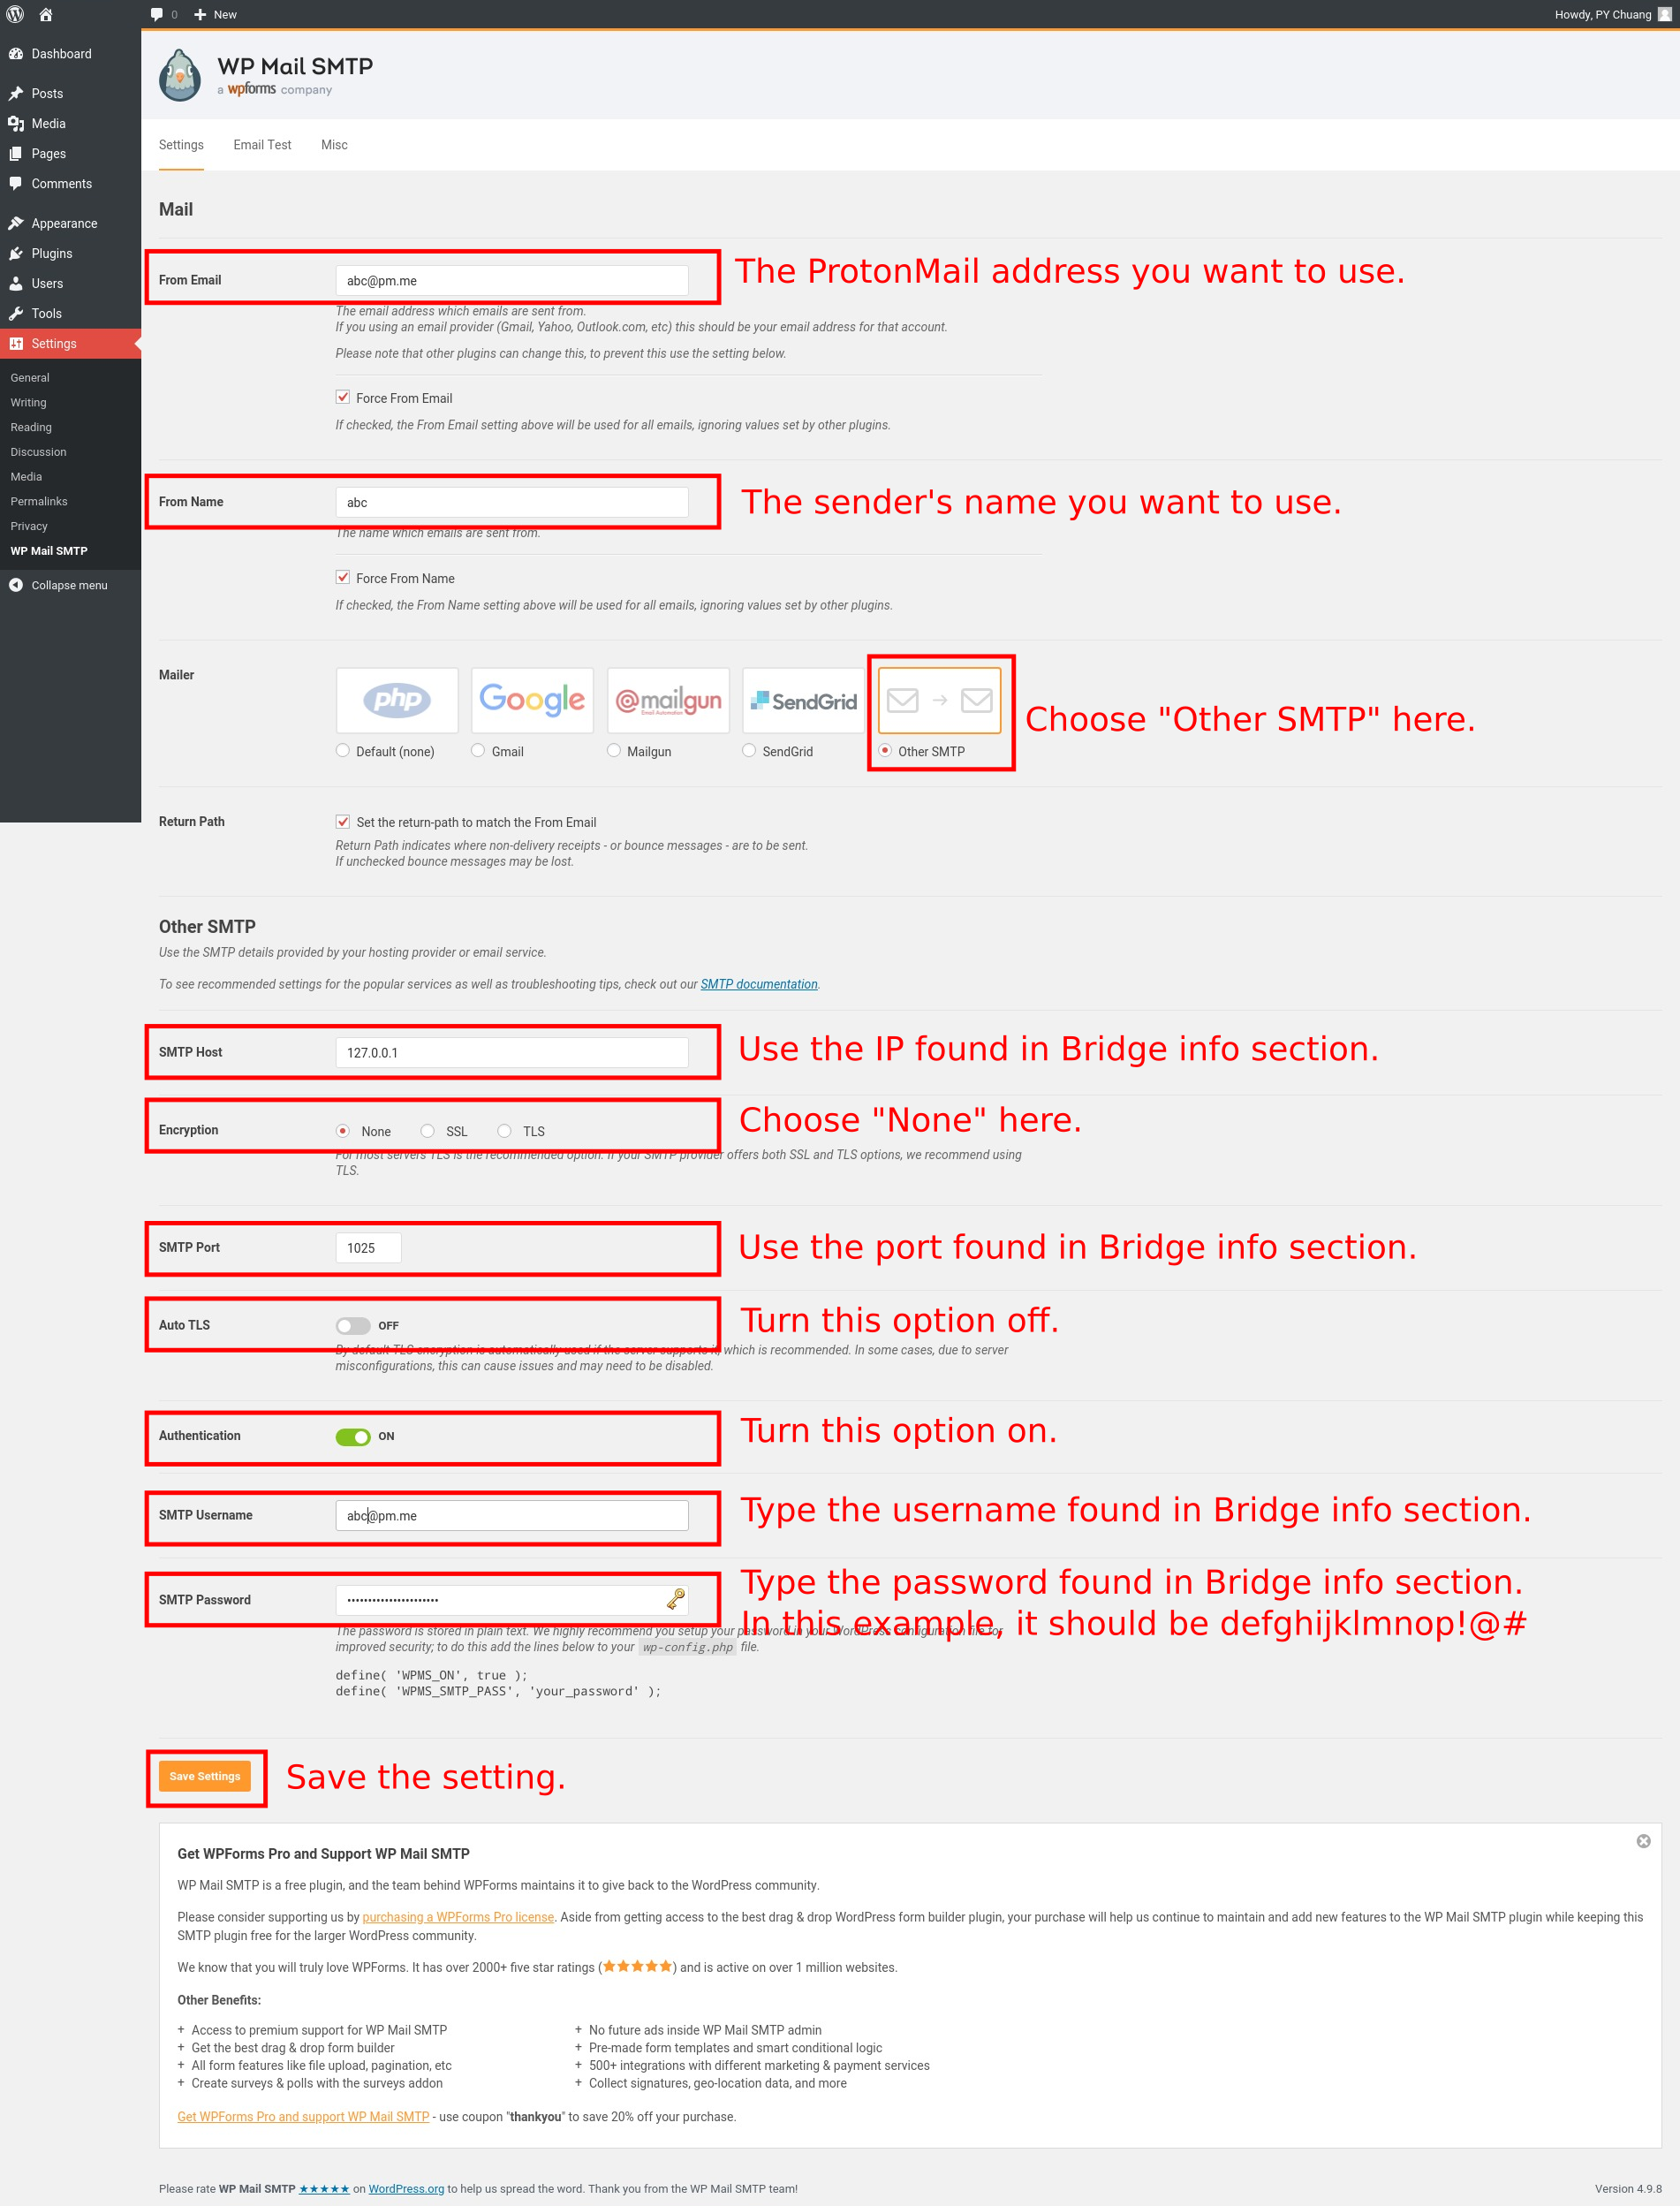
In my case, I use the WP Mail SMTP plugin in WordPress. Back to the abc@pm.me example mentioned in step 1, the Bridge info shows that we have to use
Address: 127.0.0.1
SMTP port: 1025
Username: abc@pm.me
Password: defghijklmnop!@#
Now we have to fill out the setting page of the plugin as shown in the following picture:
Test if your WordPress server can send email from the test page as shown below:
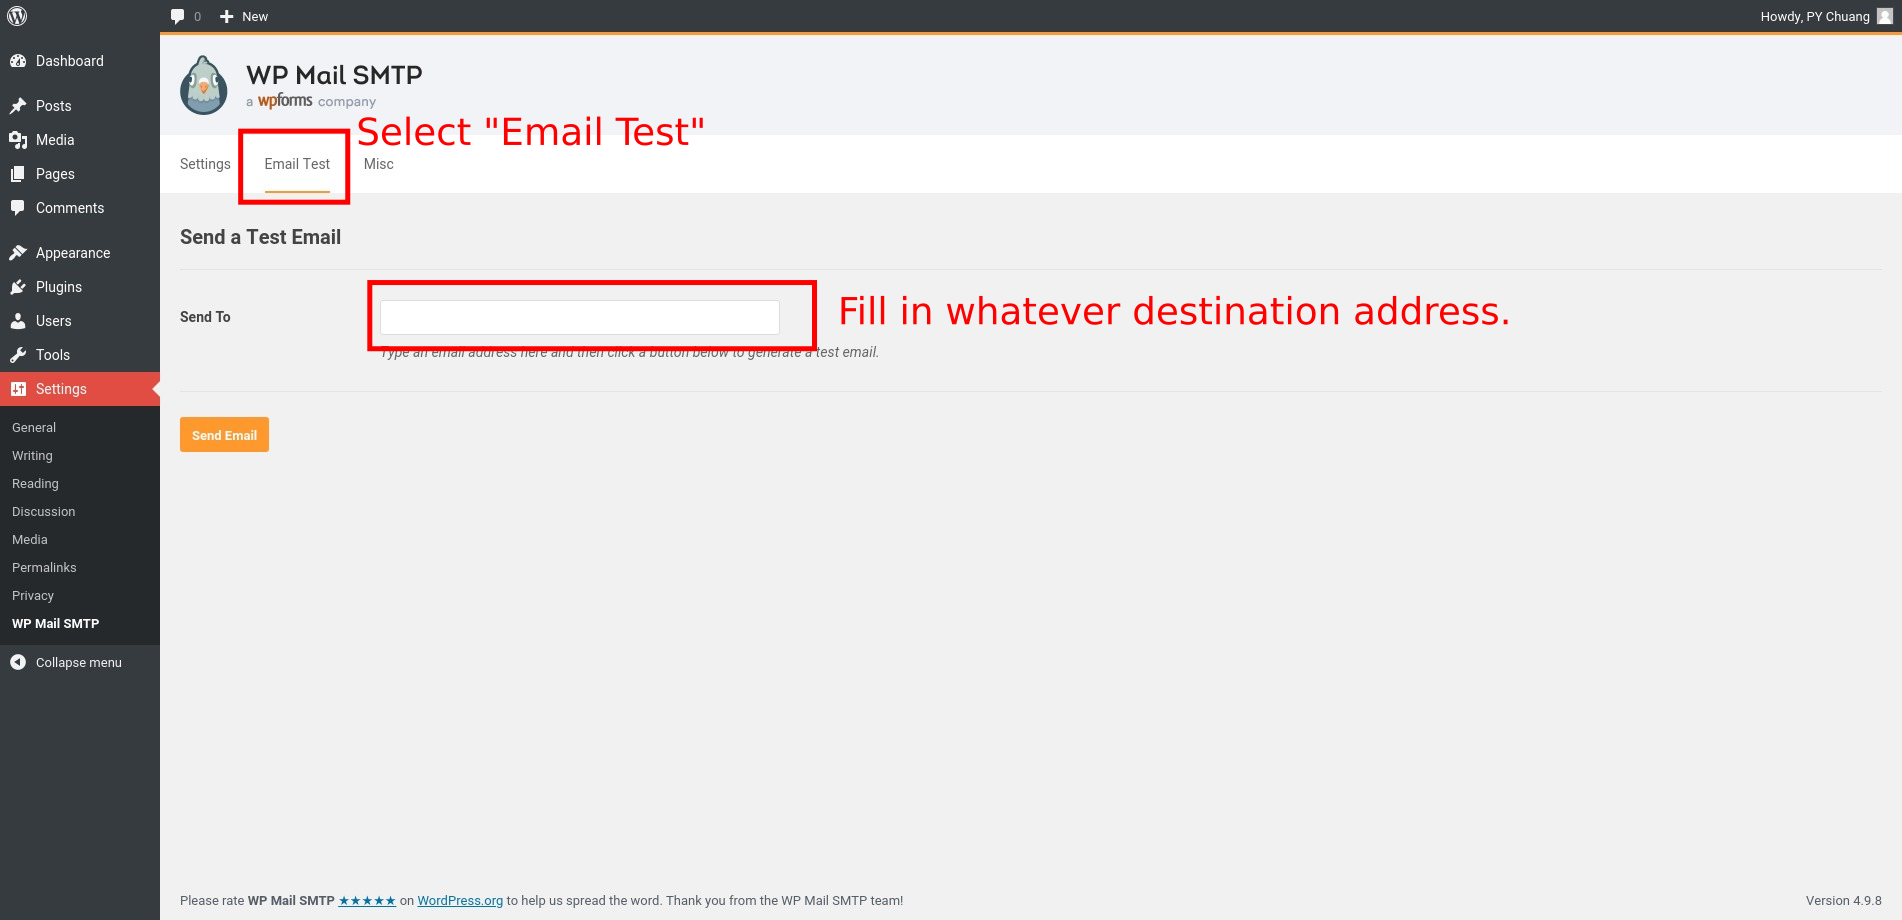
If you receive the test email at the destination address you provided, then congratulations! You are all set!
5 Comments
Great writeup! Got it running in no time for myself. Thank you so much for sharing 🙂
Thank you for the post!
so is it possible to handle even forum subscriptions with that bridge? I mean you can add custom domains to your protonmail account and add a user like Admin@customdomain. But would it be possible to send out email to new forum subscribers containing a subscriptions link??
If you mean subscription to posts and comments, then yes. I used to use Subscribe to Comments Reloaded (a plugin) to handle subscriptions. This plugin works out-of-box with WP Mail SMTP. The subscription emails will be sent under the email you used as the username in SMTP settings.
But I don’t use the subscription system anymore because too many scammers signed up the subscription with fake emails. What happened was that my ProtonMail got a log of rejected/returned mails due to these fake emails, and ProtonMail blocked me from sending new emails for a while…
Hi PyChao,
I am a complete noob at all of this stuff. I’ve tried multiple times to get it to work, but never could figure out step 1.
Would there be anyway you could help me set this up?
Nice write-up.