About one year ago, my XPS 13 7390 started to make noise. The noise came from one of the fans. I managed to lower the noise down by tuning the cooling profile: most of the time, only the good fan was running, while the defective fan only ran when the temperature was high. (See the blog at that time about how I tune it in Arch Linux.)
Recently, the remaining good fan also started to make noise. I overly relied on it to cool down the machine in the past year, and this overuse had worn it down. Two days ago, the noise became worse and very unbearable. It felt like it was going to explode. I had already ordered one replacement on eBay, but it hadn’t arrived two days ago (it’s an international package). I had to come up with another solution.
I tried another solution: using the fan from the previous version of XPS 13. Remember that in the previous versions of XPS 13, fans are fans, and heat pipes are heat pipes. In XPS 13 7390, however, fans and heat pipes are glued together into an assembly. So I wasn’t sure I could do it. It turns out it worked. And it’s a nice thing because there are many buying options for the fan replacements of the previous version. You can order a 9380 (or 9370) fan replacement with Amazon Prime and get it the next day. That is exactly what I did.
The picture shows what I meant that 9380 fans are just fans, while 7390 uses a fan-heat-pipe assembly:
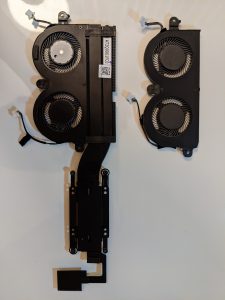 On the left is the assembly from XPS 13 7390, and the one on the right is the fan module from 9380.
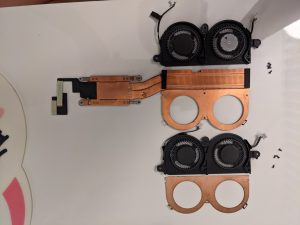
The fans are actually composed of two parts: the rotor part and the shield. The rotor parts of the fans are the same regardless of if they’re from 7390 or 9380. Only the shields are different: the 7390 fan shield is welded to the heat pipes, while the fan shield of 9380 is just a piece of metal. See the following picture:
 So I could just replace the rotor part! Awesome! I did that, and everything works like a charm now! So quiet!
By the way, if anyone is interested in how dirty the old fans were, here’s the picture.
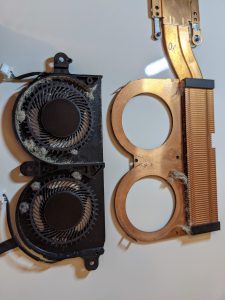
Not a lot of dirt/dust, because I cleaned it once about one year ago, and I worked from home for the past year due to the pandemic. However, it looks like the dust indeed impacted the rotation of the rotors a lot. One of the rotors is cleaner. That one spun up less during the past year after I tuned the cooling profile.
6 Comments
Thanks for documenting this process. My fan has become a pain in the ass and good to see someone already has run into / solved the issue.
Thanks for posting. After changing the fan I it’s nice and quiet again but insists on running a test before booting to Windows.
Did you hit this issue by any chance?
https://www.dell.com/community/XPS/Fan-test-on-each-boot/m-p/8251907#M101053
Nope, I didn’t experience this issue. But I don’t use Windows, and also I rarely shut down or reboot my laptop, so it’s probably just I didn’t notice the pre-check you mentioned.
What a hero you are!! I actually ordered without heatsink, to discover the heatsing and fan are welded together. Glad I found your solution. I ended up doing exactly as you described (only replacing the top part with the rotors – cleaning out the heatsink is also relevant I think – I just blew and sucked. All put together again and it seems to be working like a gem again. We will see for how long. Great PC generally but this has been frustrating too often and too long and should not happen with a pc for this price. I had cleaned (a pillow of dust) and taken out of each other twice. Now it is completely quiet but fan working hard.
Thank you, this saved us when we couldn’t find the correct heatsink+fan combo for a reasonable price anywhere. I gave everything a good clean, replaced the fans, and replaced the 7+ year old thermal paste. Very quiet now and no more temperature error.
Hi,
I read only that there could be 2 version of the fans 5v and 10v . How do we find which one is ours.
Could you help me on this please?